A robust schedule is key to effective schedule risk analysis. This article offers simple guidance on using Predict! Risk Analyser to establish more reliable results from schedule risk analysis (SRA) by enhancing the quality of your schedule. This will in turn improve your confidence in decision-making.
How to check for and report problems in your schedule
1. Undertake an initial analysis with no uncertainty
In the first instance we recommend you import the schedule with “Uncertainty” set to “None”, telling Predict! Risk Analyser to simply replicate the dates in your schedule. This allows you to verify the dates calculated in Predict! Risk Analyser against your scheduling tool’s “Plan” dates. The “Difference” column in the “Calculation” sheet (you may need to unhide this sheet) should contain zeros.
Remember that Predict! Risk Analyser may show dates that look like they are a day apart, but have an actual difference of zero. Some scheduling tools show the end of the day a task is completed, while others show the start of the following day. Predict! Risk Analyser always shows the former. You can ignore these since they are in fact the same finish time. After you’ve made any adjustments to your schedule we recommend that you repeat this import and refer to the Predict! Risk Analyser’s Schedule Check report for information on ways to enhance the robustness of the schedule.
2. Review the Predict! Risk Analyser Schedule Check report
When used in conjunction with “no uncertainty” described above, the Schedule Check report will help you to identify any features of the schedule that may be creating unexpected results. On importing a schedule, a warning message automatically appears, and directs you to the Schedule Check report for guidance on which tasks in your schedule you may want to review.
The most common problems are either due to specific issues in your schedule or result from choosing the wrong options – we consider each of these in turn in the next section.
Frequently encountered issues
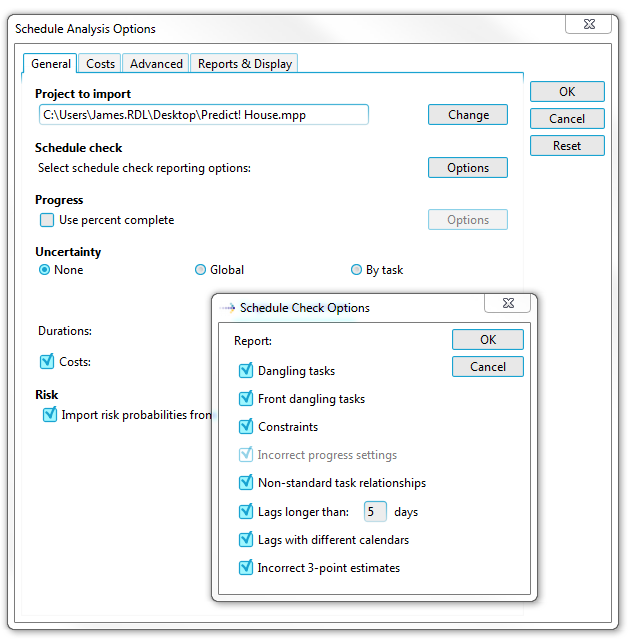
Using the schedule check report, you can check for and report problems in your schedule in seven specific areas:
1. Dangling tasks and front dangling tasks
These are tasks that are not fully linked into the schedule logic. This can result in incorrect critical path and cruciality assessment, leading to delays to the end date being misrepresented. The ideal situation is to have one front dangling task (without predecessor) at the start of the project and one dangling task (without successor) at the end. Predict! Risk Analyser will report an issue if this is not the case.

2. Constraints
Constraints will artificially anchor specific tasks on your schedule to certain dates or ranges of dates. This can lead to a reduction in the value of the Monte Carlo analysis since you are not allowing task uncertainty to give you a realistic idea of where things could be going wrong.
Often, constraints are used to represent events that are external to the project, such as subcontractor lead times. To ensure the uncertainty can be properly taken into account, it is better to create the logic using predecessor tasks. An alternative is to weaken your constraints, for example, “Must start on” could be changed to “Start no earlier than”. This allows the schedule to flex and bend to show the genuine effects of delay.

3. Incorrect progress information
For partially progressed schedules, it is important that you have proper information about how partially completed tasks should be continued. Without this information, all of your analysis dates are likely to be different to those expected. To be clear about how to handle progress, Predict! Risk Analyser must have the following information:
- When was the schedule updated? In MS Project this is the “Status date”, and in Primavera it is the “Data date”, Predict! Risk Analyser will continue progress from this point. If this is not included then Predict! Risk Analyser will schedule from the date when the schedule risk analysis was run.
- Have you updated the progress in your project plan? Tasks that have started must have an “Actual Start” date and tasks that have finished must have an “Actual Finish” date and should also have their progress set to 100%. Any tasks that have not been marked as finished will be treated as still ongoing and this will delay the predicted end date.
- Have you updated your duration estimates? Predict! Risk Analyser offers several options for setting the duration of progressed tasks, these can be selected through the “Options” for the “Use percent complete” tick box in the import options.

4. Non-standard task relationships
For schedule analysis all tasks are best linked to each other using finish-to-start relationships. Other types of relationships can have unforeseen pitfalls when analysed. Let’s explore a particular example of using start-to-start (SS) and finish-to-finish (FF) relationships, often referred to as “stretch logic”.
The example at the top of figure 7 shows two tasks – one for building a set of three window frames and one for glazing them. However, since glazing can only begin once the first frame is completed (2 days in), and the glazing of the last window can only happen once the last frame is completed, SS and FF logic with lags have been used.
As you can see, it gives the (false) idea that there is float into which any potential risk event can be absorbed. This is unrealistic, particularly in a situation where the risk occurs while glazing the last window – perhaps we smash the last pane of glass during installation.
Using the strict finish-to-start logic allows such a risk scenario to be more accurately modelled, see the bottom of figure 7. Of-course, this approach could create many extra tasks if the schedule involved installing 100 windows. In this case, it may be more desirable to apply stretch logic to the first 99 windows, and then separate out the last window using finish-to-start-logic.
5. Lags and leads
Lags and leads are often “invisible” when applied to a schedule. A perfectly innocent lag between two tasks may become its own source of uncertainty and delay. For example, let’s say that your house building project contains a lag between laying foundations and starting to build the walls – this is while you wait for the cement to dry. After adding uncertainty estimates, you may find that the lag becomes an important factor in driving the end date – what if the foundation laying finishes late and weather conditions cause the cement to take longer to dry? Because the lead up to the lag, and the lag itself might be fraught with uncertainty and risk, we advise you make lags visible by making them tasks in their own right – then you can revisit any uncertainty and risk assumptions on them that may affect the critical path.
6. Lags with different calendars
As you may be aware, different scheduling tools may apply different rules to interpret lags whose predecessor and successor tasks have different calendars. Predict! Risk Analyser will use the predecessor’s calendar to model the lag; this may result in differences from the project plan dates. To avoid this discrepancy, you should model the lag as a task, with the desired calendar.
7. Incorrect 3-point estimates
When assigning uncertainty to your tasks within your scheduling tool, it can be easy to make a mistake by entering your three-point estimates in the wrong order. Predict! Risk Analyser can report these.
Ensure that you are using the correct options
With so much information in your project plan, it’s worth double-checking the uncertainty options you used when you imported your plan. The “Summary” sheet of your schedule import will give you a reminder of some of the options you have chosen. Give special consideration to:
- Use Percent Complete: As mentioned earlier, have you selected the appropriate options and completed the mandatory information for a partially progressed schedule?
- Uncertainty: Have you correctly selected how Predict! Risk Analyser will import uncertainty – for example, where are your three-point estimates coming from?
- Work in whole days: This is an advanced option that allows you to round up (or not) to whole working days. Does your project work in a way where successor task can start on the same day as the predecessor finishes? Rounding to whole days can extend your schedule.
- Exclude constraints: This is an advanced option that lets you ignore the effects of constraints, and can result in different answers to those expected. Make sure the constrained tasks have appropriate logic before using this option – they must not be dangling tasks.
- Manually scheduled tasks: Does your planning tool require you to manually update the Gantt chart and task dates? Predict! Risk Analyser will always calculate information using the latest logic in the schedule. Also consider your calendars. Did you know that Predict! Risk Analyser can take account of individual calendars that you have assigned to each task? It will attempt to use the task calendar first and, if this is not set, revert to the default project calendar.
Conclusion
Most schedule analysis issues are due to specific flaws in the schedule or to the analysis options chosen. These are easily identified by:
- Using Predict! Risk Analyser’s Schedule check report
- Ensuring that you choose the appropriate schedule import options.
For other useful trouble-shooting tips, consult sections 3 and 6 of the Predict! Risk Analyser User Guide: available via the Predict! Risk Analyser menu, or the Customer Login area.